Download Custom Resolution Utility (CRU)
Unleashes the impact of the CRU tool on your monitor’s display. This allows users to take control of the settings and upgrade the visual experience. Learn to tune, tweak, and optimize like a pro now.
Are you one among the others who was taken aback after seeing the requirements of the GTA 6 game? What if I give you a secret ingredient to enhance your standard PC experience with high-level gaming performances?
It is possible to tweak the display settings of a monitor with a Custom Resolution Utility (CRU), a handy and powerful tool. It is a perfect “tuning fork” for all gamers, cinephiles, or anyone seeking control over their monitor display. Uncover the pivotal role of this CRU tool and its impact in the latest gaming world. Now’s the moment to get your favourite games.
Custom Resolution Utility (CRU) - Unlock Higher Resolutions & Refresh Rates for an Optimized Display!
Custom Resolution Utility (CRU) is a one-stop solution to fix your resolutions, refresh rates, screen tearing, and many other multi-monitor setup settings. CRU allows you to tweak your monitor’s display beyond its factory limitations. This enables all the ardent gamers to give the finest touch and details to the resolutions and refresh rates per their requirements.
You can take over your control panel, edit it, add the preferred resolutions or tweak the existing ones. So, why stop with the standard system limitations when you can control your monitor’s display settings? Now that you understand that CRU interfaces directly with your graphics card’s driver let’s shift gears to its fantastic features and user interface.
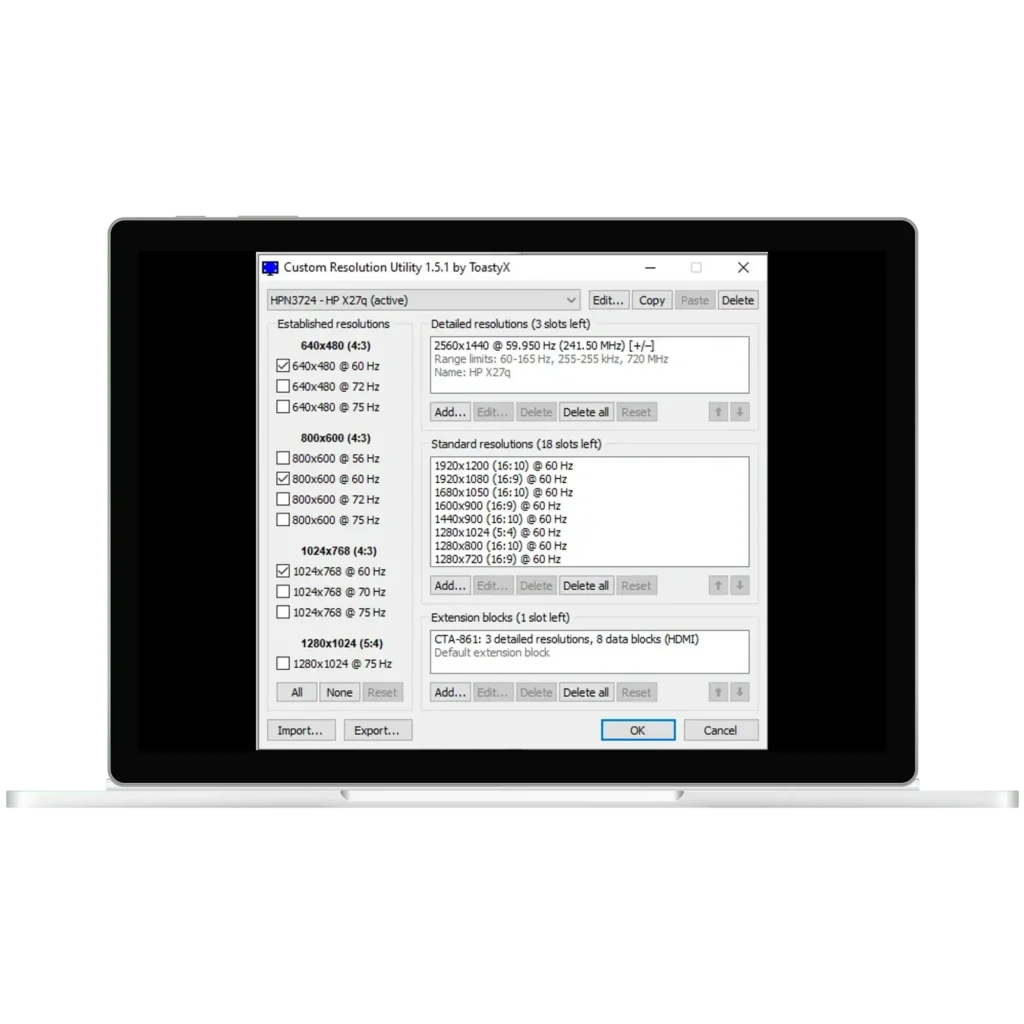
Inside CRU: A Glimpse At Its Game-Changing User Interface
Initially, it can be pretty puzzling, so we are here to highlight CRU's user-friendly interface.
Main Window Overview
As soon as you open Custom Resolution Utility (CRU) on your dashboard, you can see all your connected displays. It can be your monitors, projectors, and other displays.
Displays
Now, you can see all the displays and their specific current resolutions and settings. As said, every display will be listed with its monitor's name and detailed manufacturer information.
Resolutions Settings
With the help of CRU, you can modify and edit the available resolutions. There are several options included in the resolution settings, such as width (horizontal pixels), height (vertical pixels), refresh rate (Hz), timing standard (CVT, GTF), or manual timings.
Standard Resolutions
There are lists of supported standard resolutions available on your monitor. CRU's most common standard resolutions are 1920x1080, 2560x1440, 3840x2160, and so on. If you want to modify this existing resolution, simply add a new one.
Restart Button (GPU Driver Restart)
You can click on the restart button upon completion. This makes the in-built GPU driver force restart without needing to reboot. Thus, the time taken to implement the new settings is faster and easier.
Multi-Monitor Setup
CRU is built to handle multiple-monitor setups seamlessly. So, you can select each display from multiple connected monitors. Then, proceed to apply different settings or custom resolutions to each monitor. Doesn't that sound handy?
Revolutionize Your Display with CRU's Built-In Features
- Precision Calibration Be it the colour accuracy or resolutions, the custom resolution utility has never failed to fulfil user requirements. Slowly yet precisely added inputs will enable the CRU to run smoothly and glitch-free. Adjust the refresh rates accordingly to experience reduced screen tearing and seamless workflow.
- Beta Testing It also has a feature that enables users to back up files and run configuration settings. However, this allows you to add and create your own required resolution; it is best to input fewer timing parameters and refresh rates and run a beta test. In overclocking, the refresh rates will result in screen tearing and black screens. Look through the manufacturer's instructions and be cautious of your tweak inputs.
- Breaking Hardware Boundaries The monitor's display hardware is always limited to the user's capabilities. But, through this CRU, you can easily adjust and modify the graphics cards on your monitor. This enables you to proceed with a new resolution or refresh rate not supported by your existing graphics cards. Now, maximize your hardware with this powerful and unstoppable CRU tool.
- Tailoring Display Resolutions The increased refresh rate CRU is the core feature of this tool. This allows users to maximize their performance by tweaking the display configurations. Users can curate their desired requirements from horizontal and vertical pixel counts to timing parameters. As a result of this tweak, one can improve their gaming performance, visuals, and input lags. Therefore, don't stop with the normal presets of your monitor's settings.
How to Download & Install CRU on Windows
Get Started With CRU In A Few Easy Steps — Download & Extract Now!
Here are the breakdowns for the ways to download, install, and quickly set up Custom Resolution Utility on Windows.
Open the web browser on your device and go to the official site to download CRU. Before you do it, ensure whether it is from an authentic website and the latest version of CRU.
Click on the latest version of Custom Resolution Utility (CRU). Beside this, you can see the download button. Proceed to download the file from the website. Ensure that the file is named "CRU.zip."
You can now choose a location on your desktop to save this ZIP file. Here, 'it needs to be installed; instead, you will extract the file. If you are using Windows, right-click on the CRU.Zip file and select "Extract All."
A new window will pop up requesting that you choose a new folder for the extracted files. Once everything is done, you will find the CRU.exe program saved in the destination folder, along with several other extracted files.
Moreover, if you have tools like WinRAR or 7-Zip installed on your computer, right-click on the CRU.Zip file. You can then select the Extract Here option and choose the folder you want.
Proceed with the next step by launching the CRU.exe tool from the extracted folder. Once you Double-tap on the file, it will open. Since CRU doesn't require any installation, you can directly run the program from your extracted folder.
The core ability of this CRU tool is that it allows you to edit, add, or remove the resolutions for your display. Go ahead and add the detailed resolutions on the dialogue box that appears on your screen. This enables you to set the desired resolutions by adjusting the parameters.
Once you have made changes to the resolutions, click on the button "Apply" to save them. You don't have to reboot your system to input the new changes. Simply click on the "Restart" button from your CRU folder. Run the beta test carefully. Therefore, you can experience your graphics driver's quick and more effortless restart process.
It is always recommended that you save the current CRU configurations before implementing the new changes. Go to settings export in CRU and save this configuration as a file. This will help you restore your existing settings quickly later.
Overall Gist Into Creating Custom Resolutions are as follows:
- Reading & Modifying EDID Data
- Creating Custom Resolutions
- Generating Custom Timing
- Saving & Applying Settings
- Restarting Graphics Driver
- Testing & Running Settings
Download Custom Resolution Utility (CRU)
Download CRU (Latest Version 1.5.2)
Custom Resolution Utility (CRU) is a popular Windows tool that allows users to define custom display resolutions, refresh rates, and timing parameters. It's lightweight, portable, and perfect for advanced display tweaking.
Key Takeaways
Compatibility — Always be cautious of the resolution you input in the custom settings. Adding the unsupported resolution may result in an error or have unintended consequences.
Backup —That is why it is advised to have a backup of your CRU configuration and run a beta test carefully.
Revert to default —You can toggle or revert in case you need it. These errors often come because of the invalid or incorrect values.
The Flip Side: Uncover the Pros and Cons of CRU Now!
It's an undeniable fact that custom resolution utility offers a wide range of control over the display's monitor. However, there are some technical aspects that make this CRU a downfall. Let me break down the benefits and drawbacks for you in detail.
How To Dodge The Common Troubleshooting Issues? Fix it with tricks!
Speaking of errors, there are a few common troubleshooting issues that occur before and after making changes in the CRU configurations. If you are facing the following issues, they can be fixed with simple tricks.
Final Thoughts – Get the Best Display Experience with CRU
In today’s gaming world, PC gaming is predominantly ruling this industry. Who wouldn’t love the stunning graphics and endless customization options? Having a handy CRU tool is what is needed for your ultimate gaming performance, productivity, and a visual treat.
Beginning from overclocking the refresh rate to fine-tuning the resolution settings, Custom Resolution Utility brings the best optimization for the screen display. Do you have a game squad? Or tech-savvy friends? Revive them by sharing this ultimate toolkit.
Frequently Asked Questions (FAQs)
Custom Resolution Utility is absolutely safe, unlike other corrupted third-party files. Ensure to back up your settings and understand its refresh rate's limits.
Undoubtedly, you can overclock your monitor by pushing the boundaries of resolutions and refresh rates high and easily with the help of CRU.
You can find the "Reset" option on the CRU settings screen. By clicking on it, it will change your display settings to the default state.
The custom resolution might not show on your Windows if it is incompatible with your GPU or monitor. Apart from this, you can verify whether you have the correct inputs to the settings. You can also try adjusting the timing parameters or rebooting the system.
Indeed, CRU offers you to take complete control over all your displays on both laptops and external monitors.
In order to increase your refresh rate safely using CRU, you must gradually add the high value under the "Refresh Rate" section. Tweaking more, the monitor's specs will end up on a black screen, and the display will flicker. Run a test for the display stability.